Start-spark
How to setup Apache Spark
Getting started with Spark
This tutorial was written in June 2014. It covers the version 1.0.0 released on may 30, 2014.
The tutorial covers Spark setup on a new Ubuntu 14.04 x64 virtual machine :
Linux prerequisites for Spark
Spark build and installation
Spark configuration
standalone cluster setup (one master and 3 slaves on a single machine)
execution of the
PIapproximation (in Scala) job with spark-shell
Dev station setup
Before installing Spark:
Ubuntu 14.04 LTS amd64 (MD5 (ubuntu-14.04-desktop-amd64.iso) = dccff28314d9ae4ed262cfc6f35e5153) in a virtual machine (1 cpu / 2 Go RAM with Fusion on OSx)
Python 2.7.3 (comming out of box)
What we are going to install :
Oracle JDK 1.7.0_60
Scala 2.10.4
Git 1.9.1
Spark 1.0.0
SSH server
Introduction
Spark's slogan is "lightning-fast cluster computing" coming from the AMPLab at UC Berkeley.
The conception and development started as a research project and turned into Apache incubator in june 2013. Graduated an Apache Top-Level Project in February 2014, this framework has a rapidly growing users and developers community.
Mainly written in Scala, Spark provides Scala, Java and Python APIs. Scala API provides a way to write concise, higher level routines that effectively manipulate distributed data.
Code teasing
For the most impatient, check the examples from the documentation to see the simplicity to distribute computation with Scala, Java and Python APIs.
Corner stone : Resilient Distributed Dataset (RDD)
*A few words about the Resilient Ditributed Dataset introduced in Spark core design.
A Resilient Ditributed Dataset is a collection distributed all over the Spark cluster. RDDs' main purpose is to support higher-level, parallel operations on data in a straightforward manner. There are currently two types of RDDs: parallelized collections, which take an existing Scala collection and run operations on it in parallel, and Hadoop datasets, which run functions on each record of a file in HDFS (or any other storage system supported by Hadoop).
Requirements on the environnement (OS side)
The following setup follows steps for a 'fresh' Ubuntu installation. Meaning that it's the first run of my Ubuntu right now.
Details of the distribution
snoop@ubuntu:~$ uname -a
# should return:
Linux ubuntu 3.13.0-23-generic #45-Ubuntu SMP Fri Apr 4 06:58:38 UTC 2014 x86_64 x86_64 x86_64 GNU/Linux

snoop@ubuntu:~$ lsb_release -a
# should return:
No LSB modules are available.
Distributor ID: Ubuntu
Description:    Ubuntu Trusty Tahr (development branch)
Release:    14.04
Codename:   trusty
Install Java 7
Due to licence restrictions from Oracle, the sun JDK package is no longer available from Ubuntu repositories. Here is a little code snippet to download and install the Oracle JDK7.
(optional) clean up OpenJDK if any version is on your Ubuntu station not freshly installed.
snoop@ubuntu:~$ sudo apt-get purge openjdk*
Prepare the Java7 installation, here is the ~/java7.sh script, open an editor and add the following :
#!/bin/sh -Eux

# Add a new repository a your sources lists
echo "deb http://ppa.launchpad.net/webupd8team/java/ubuntu precise main" | tee /etc/apt/sources.list.d/webupd8team-java.list
echo "deb-src http://ppa.launchpad.net/webupd8team/java/ubuntu precise main" | tee -a /etc/apt/sources.list.d/webupd8team-java.list
apt-key adv --keyserver keyserver.ubuntu.com --recv-keys EEA14886

# Update apt-get
apt-get -y update
echo oracle-java7-installer shared/accepted-oracle-license-v1-1 select true | sudo /usr/bin/debconf-set-selections

# First attempt to install the package
apt-get -y install oracle-java7-installer

# 'lost connection' happen all the time, a quick loop to ensure that network failure do not break the installation process
while ! apt-get -y install oracle-java7-installer
do
    sleep 1
done
Install Java7 (taking few minutes) with :
snoop@ubuntu:~$ chmod +x java7.sh
snoop@ubuntu:~$ sudo ./java7.sh
# should return:
# [...] many outputs taking few minutes finishing by :
+ apt-get -y install oracle-java7-installer Reading package lists... Done Building dependency tree
Reading state information... Done
oracle-java7-installer is already the newest version.
0 upgraded, 0 newly installed, 0 to remove and 476 not upgraded
Check the JAVA path :
snoop@ubuntu:~$ file `which java`
# should return:
# /usr/bin/java: symbolic link to `/etc/alternatives/java'

snoop@ubuntu:~$ file /etc/alternatives/java
# should return:
# /etc/alternatives/java: symbolic link to `/usr/lib/jvm/java-7-oracle/jre/bin/java'
And check the java version :
snoop@ubuntu:~$ java -version
# should return:
# java version "1.7.0_60"
# Java(TM) SE Runtime Environment (build 1.7.0_60-b19)
# Java HotSpot(TM) 64-Bit Server VM (build 24.60-b09, mixed mode)
Set JAVA_HOME
Check the current \$JAVA_HOME value :
snoop@ubuntu:~$ echo $JAVA_HOME
# should return: nothing
From the Java path checking, set the \$JAVA_HOME for the current user and load it :
snoop@ubuntu:~$ echo "JAVA_HOME=/usr/lib/jvm/java-7-oracle/" >> ~/.bashrc
snoop@ubuntu:~$ source ~/.bashrc
Check the new \$JAVA_HOME value :
snoop@ubuntu:~$ echo $JAVA_HOME
# should return:
# /usr/lib/jvm/java-7-oracle/
Let’s do it for the whole system with sudo :
snoop@ubuntu:~$ sudo bash -c 'echo "JAVA_HOME=/usr/lib/jvm/java-7-oracle/" >> /etc/environment'
Having problems with Java setup? Check the ubuntu Java 7 documentation
Install Scala
Spark 1.0.0 depends on Scala 2.10 and any version 2.10.x should be fine.
So we are going to install the latest stable 2.10.4 package from the official page :
snoop@ubuntu:~$ wget http://www.scala-lang.org/files/archive/scala-2.10.4.deb
Install the .deb file :
snoop@ubuntu:~$ dpkg -i scala-2.10.4.deb
Check the version :
snoop@ubuntu:~$ scala -version
# should return:
# Scala code runner version 2.10.4 -- Copyright 2002-2013, LAMP/EPFL
Set SCALA_HOME
Set the SCALA_HOME for the current user, load it and check the variable :
snoop@ubuntu:~$ echo "SCALA_HOME=/usr/share/java" >> ~/.bashrc
snoop@ubuntu:~$ source ~/.bashrc
snoop@ubuntu:~$ echo $SCALA_HOME
# should return:
# /usr/share/java
Don’t be afraid to set this path, the scala jar are there :
snoop@ubuntu:~$ ls -al /usr/share/java |grep scala
Install Spark
There are two options to install Spark :
- Install an official build from the download page.
or
- Build and install out own from the source.
Since we need to use the monitoring metrics in Ganglia, we are going to build Spark and explicitly include ganglia (see more here)
Install git
With apt-get and sudo :
snoop@ubuntu:~$ sudo apt-get install git
Get the sources
Clone the git repository, go to the spark folder and checkout the version 1.0.0:
snoop@ubuntu:~$ git clone https://github.com/apache/spark.git
snoop@ubuntu:~$ cd spark/
snoop@ubuntu:~/spark$ git checkout v1.0.0
# should return:
Note: checking out 'v1.0.0'.
[...]
HEAD is now at 2f1dc86... [maven-release-plugin] prepare release v1.0.0-rc11
Build Spark
We are going to build Spark with sbt, a build tool for Scala and Java, provided in the sources.
Our Spark build will include two additional features as build options :
Hadoop 2.2.0 support instead of Hadoop 1.0.4 using
SPARK_HADOOP_VERSION=2.2.0Ganglia sink for monitoring using
SPARK_GANGLIA_LGPL=true
To build Spark with Ganglia and Hadoop 2.2.0, set the environment
variables in the command line and run the sbt assembly command :
snoop@ubuntu:~/spark$ SPARK_GANGLIA_LGPL=true SPARK_HADOOP_VERSION=2.2.0 ./sbt/sbt assembly
# should return:
# [info] Checking every .class/.jar file's SHA-1.
[info] SHA-1: da9d2faea382a681d15457e9b01cc96940b6872f
[info] Packaging /home/snoop/spark/examples/target/scala-2.10/spark-examples-1.0.0-hadoop2.2.0.jar ...
[info] Done packaging.
[success] Total time: 2103 s, completed Jun 15, 2014 2:38:25 PM
Once it’s done, the easiest way to use Spark is to run the shell (local instance) :
snoop@ubuntu:~/spark$ ./bin/spark-shell
# should return:
14/06/16 00:33:25 INFO SparkILoop: Created spark context..
Spark context available as sc.
scala>
Some logs are printed in the console for the moment and no error should happen. Quit the shell with 'ctrl + d'.
Run Spark in standalone mode
After a successful build, it’s time to play (a bit) with Spark in standalone mode. In this mode, a master AND several slaves run as seperate JVM on localhost to simulate a cluster behavior.
Set the environnement (Spark side)
Several steps are required before running Spark smoothly in this mode :
Set up SSH and enable connection without password from localhost to localhost for the current user ;
Set the file
/conf/spark-env.shfrom the template and define the number of workers (slaves in JVM).Set the
/etc/hostswith the IP address of eth0 associated to thehostnameSet a nicer logger format with log4j to a file
Set up and enable SSH connections
- Install and start SSH server with this command :
snoop@ubuntu:~$ sudo apt-get -y install openssh-server
- Generate RSA keys for the current user with
ssh-keygenand the option-P ""to set a blank password on the private key (BE CAREFULL: that disables private key password, do not use in a production environment without security measures) :
snoop@ubuntu:~$ ssh-keygen -P ""
# should return:
# Generating public/private rsa key pair.
Enter file in which to save the key (/home/snoop/.ssh/id_rsa):
Created directory '/home/snoop/.ssh'.
Your identification has been saved in /home/snoop/.ssh/id_rsa.
Your public key has been saved in /home/snoop/.ssh/id_rsa.pub.
The key fingerprint is:
db:68:50:07:55:13:6a:e6:15:21:74:10:3c:29:d2:d3 snoop@ubuntu
The key's randomart image is:
+--[ RSA 2048]----+
|              o+.|
|             oo .|
|            oo.E.|
|         . o=o+ o|
|        S o .B.. |
|         .  o.   |
|           . ..o |
|           .o.+  |
|          ....   |
+-----------------+
- Authorize the key for a connection from localhost to localhost with the current user :
snoop@ubuntu:~$ ssh-copy-id snoop@localhost
# should return:
# The authenticity of host 'localhost (127.0.0.1)' can't be established. ECDSA key fingerprint is 75:a7:59:88:34:fc:34:ce:82:f3:4a:3b:d9:0f:4b:e3.
Are you sure you want to continue connecting (yes/no)? yes /usr/bin/ssh-copy-id: INFO: attempting to log in with the new key(s), to filter out any that are already installed /usr/bin/ssh-copy-id: INFO: 1 key(s) remain to be installed -- if you are prompted now it is to install the new keys
snoop@localhost's password:
Number of key(s) added: 1
Now try logging into the machine, with:   "ssh 'snoop@localhost'" and check to make sure that only the key(s) you wanted were added.
- Check the connection, the following command should not ask for any password and return a prompt directly :
snoop@ubuntu:~$ ssh localhost
# should return:
# Welcome to Ubuntu Trusty Tahr (development branch) (GNU/Linux 3.13.0-23-generic x86_64)
Documentation:  https://help.ubuntu.com/
Then exit from the SSH connection :
snoop@ubuntu:~$ exit
logout Connection to localhost closed.
\ Set the Spark environnement
Copy the template from conf/spark-env.sh.template to conf/spark-env.sh :
snoop@ubuntu:~$ cd spark
snoop@ubuntu:~/spark$ cp conf/spark-env.sh.template conf/spark-env.sh
And set the number of workers at 3 with the enviroment variable
SPARK_WORKER_INSTANCES :
snoop@ubuntu:~/spark$ echo "export SPARK_WORKER_INSTANCES=3" >> ./conf/spark-env.sh
Set the /etc/hosts
The workers and the master communicate through the network and require a valid DNS entries. In standalone mode, a DNS server is not required and these entries can be set manually in the /etc/hosts file.
Run hostname command to be sure :
snoop@ubuntu:~/spark$ hostname
# should return:
# ubuntu
Check your IP address on eth0 (assigned by DHCP in default configuration) :
snoop@ubuntu:~/spark$ ifconfig | perl -nle'/dr:(\S+)/ && print $1' | head -n 1
# should return:
# 192.168.67.190
Then edit your /etc/hosts to look like the following (you can remove
127.0.1.1 and IPv6 sections) :
snoop@ubuntu:~/spark$ cat /etc/hosts
127.0.0.1   localhost
192.168.67.190  ubuntu
NOTE: the important point here is that the hostname (ubuntu) must be bound to the external IP (192.168.67.190)
Set the log4j logger
We need to redirect the logs to a file instead of the console (displayed
in the shell), be careful to set your path for the key
log4j.appender.FILE.File :
snoop@ubuntu:~/spark$ cp conf/log4j.properties.template conf/log4j.properties
snoop@ubuntu:~/spark$ vim conf/log4j.properties
# Initialize root logger
log4j.rootLogger=INFO, FILE
log4j.rootCategory=INFO, FILE

# Set the appender named FILE to be a File appender
log4j.appender.FILE=org.apache.log4j.FileAppender

# Change the path to where you want the log file to reside
log4j.appender.FILE.File=/home/snoop/spark/logs/SparkOut.log

# Prettify output a bit
log4j.appender.FILE.layout=org.apache.log4j.PatternLayout
log4j.appender.FILE.layout.ConversionPattern=%d{yy/MM/dd HH:mm:ss} %p %c{1}: %m%n

Settings to quiet third party logs that are too verbose log4j.logger.org.eclipse.jetty=WARN log4j.logger.org.apache.spark.repl.SparkIMainexprTyper=INFO log4j.logger.org.apache.spark.repl.SparkILoopSparkILoopInterpreter=INFO
Start the master
Use the start-master.sh script :
snoop@ubuntu:~/spark$ ./sbin/start-master.sh
# should return:
# starting org.apache.spark.deploy.master.Master, logging to /home/snoop/spark/sbin/../logs/spark-snoop-org.apache.spark.deploy.master.Master-1-ubuntu.out
Check the process with jps :
$ jps
# should return:
# 40334 Master
  40322 Jps
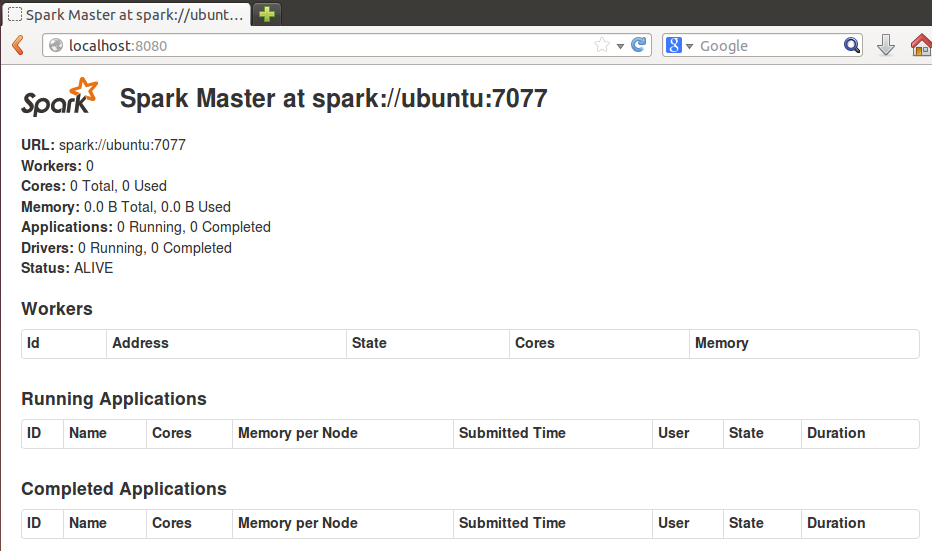
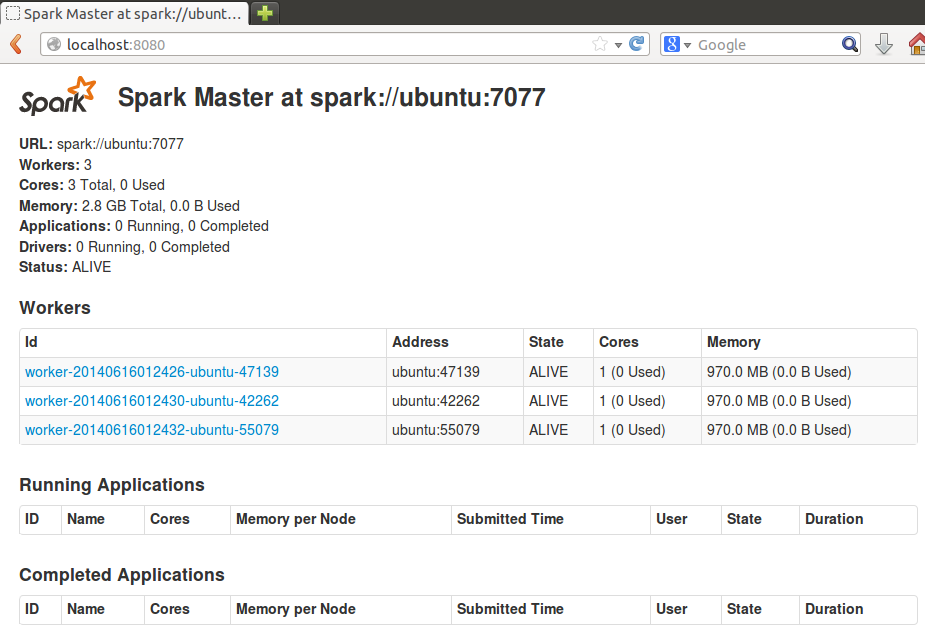
Check the master web UI on your browser : http://localhost:8080
Start the 3 slaves
Use the start-slave.sh script :
snoop@ubuntu:~/spark$ ./sbin/start-slaves.sh -h spark://ubuntu:7077
# should return:
# localhost: starting org.apache.spark.deploy.worker.Worker, logging to /home/snoop/spark/sbin/../logs/spark-snoop-org.apache.spark.deploy.worker.Worker-1-ubuntu.out localhost: starting org.apache.spark.deploy.worker.Worker, logging to /home/snoop/spark/sbin/../logs/spark-snoop-org.apache.spark.deploy.worker.Worker-2-ubuntu.out localhost: starting org.apache.spark.deploy.worker.Worker, logging to /home/snoop/spark/sbin/../logs/spark-snoop-org.apache.spark.deploy.worker.Worker-3-ubuntu.out
Check the process with jps :
snoop@ubuntu:~/spark$ jps
# should return:
# 41376 Jps
40334 Master
41297 Worker
41058 Worker
40831 Worker
Start/stop the master and the workers in one shoot
Stop the master and the workers:
snoop@ubuntu:~/spark$ ./sbin/stop-all.sh
\ Start again :
snoop@ubuntu:~/spark$ ./sbin/start-all.sh
Playing with Spark (shell)
Finally we reach the intersting part ! Welcome to Spark and enjoy the journey :)
Fire up the shell
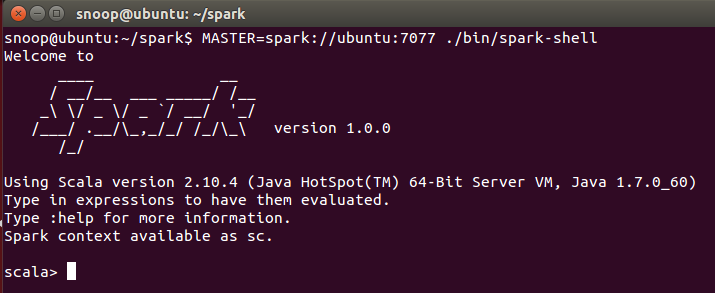
Time to run the console against the cluster :
snoop@ubuntu:~/spark$ MASTER=spark://ubuntu:7077 ./bin/spark-shell
Et voilà !
Spark up and ready at home for interactive commande (read Scala commandes) :
Hello Spark
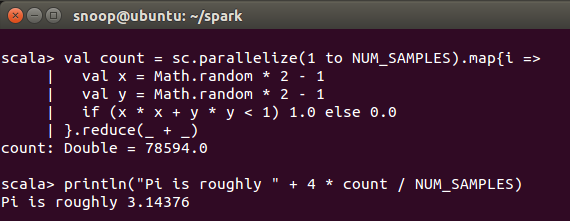
A quick implementation of Pi approximation suggested by mbonaci is a good example. Write the following code in the spark console :
/* throwing darts and examining coordinates */
val NUM_SAMPLES = 100000
val count = sc.parallelize(1 to NUM_SAMPLES).map{i =>
  val x = Math.random * 2 - 1
  val y = Math.random * 2 - 1
  if (x * x + y * y < 1) 1.0 else 0.0
}.reduce(_ + _)

println("Pi is roughly " + 4 * count / NUM_SAMPLES)
And hit ‘enter’ to see the result :
You can now use the Spark Context and test some code in standalone mode.
The next article will focus on application developpement giving details on code writing with Eclipse, build with sbt, submission to this standalone cluster.
Thanks for reading.
Reference
The tutorial was (greatly) inspired by mbonaci's exploration on version 0.9.0. Thanks for sharing.